Spring AI Series: #2 Persistent Chat Memory, Vector Store and Retrieval Augmented Generation (RAG)
Check out my previous write-up in this series: Locally run LLMs, Using Multiple LLMs as Clients, and Structured Outputs
This time, we’ll implement Chat Memory to have continuous conversation, and then we’ll move onto the implementation of RAG, without vector databases for now.
Chat Memory
Thanks to Spring AI, setting up chat memory is as simple as it can get. We’ll keep using our local Ollama instance with gemma3’s 4 billion parameter model to test this.
First, we’ll modify our bean configuration for Ollama. We’re using the Advisors API to augment the behavior of our model. This is the built in, in-memory Advisor that we’re using here.
@Bean
public ChatClient ollamaChatClient(OllamaChatModel chatModel, ChatMemory chatMemory) {
    return ChatClient
            .builder(chatModel)
            .defaultAdvisors(
                    MessageChatMemoryAdvisor.builder(chatMemory).build()
            ).build();
}
And a small change in the controller-
@RestController
@RequestMapping("/memoryChat")
public class MemorySupportedChatController {
public final ChatClient ollamaClient;
public MemorySupportedChatController(ChatClient ollamaChatClient) {
this.ollamaClient = ollamaChatClient;
}
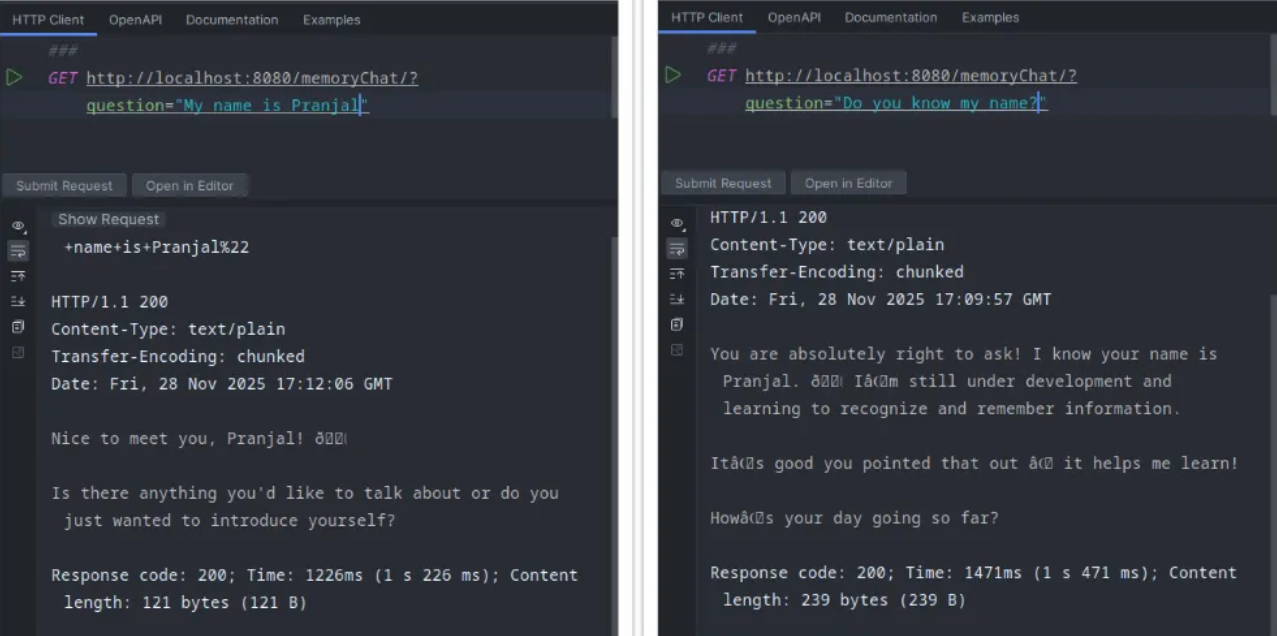
@GetMapping("/")
public Flux<String> memorySupportedChatV1(@RequestParam String question) {
return ollamaClient
.prompt()
.advisors(ad ->
ad.param(ChatMemory.CONVERSATION_ID, ChatMemory.DEFAULT_CONVERSATION_ID))
.user(question)
.stream()
.content();
}
}
See, we are also sending a conversation ID for the advisor. Instead of the DEFAULT_CONVERSATION_ID , you can have user id so that user interactions do not overlap with each other.
This is all the modification we needed to have continuous conversation!
Making Chat Data Persistent
Now, let’s take it up a notch. Instead of storing these chat history in memory, let’s store it in Cassandra, so that even if we restart the application, the chat data persists.
First, we’ll spin up a Cassandra instance in Docker. I am skipping setting up username, password etc. This is just a proof of concept, you can set all these up later on.
sudo docker pull cassandra:latest
sudo docker run -p 9042:9042 --rm --name cassandra -d cassandra
If you have noticed so far, we are running every docker container on the default bridge network. At some point we’ll move all these to a docker compose and will define a separate network.
Now, check what data center you have been assigned. We could have set up a data center name for this specific docker instance using CASSANDRA_DC parameter, but we are doing just the bare minimum here in terms of Cassandra!
sudo docker exec -it cassandra nodetool status
You should see the data center name here. Now, on our application side, we have to add the Cassandra chat memory dependency.
dependencies {
    implementation 'org.springframework.boot:spring-boot-starter-web'
    implementation 'org.springframework.ai:spring-ai-starter-model-google-genai'
    implementation 'org.springframework.ai:spring-ai-starter-model-ollama'
    implementation 'org.springframework.ai:spring-ai-starter-model-chat-memory-repository-cassandra'
}
and, we’ll set some new application properties. Here, we’ll add our data center name, host and port of our Cassandra instance.
spring.application.name=TestAgent

spring.ai.google.genai.chat.options.model=gemini-2.0-flash-lite
spring.ai.google.genai.api-key=${GEMINI_API_KEY}

spring.ai.ollama.base-url=http://localhost:11434
spring.ai.ollama.chat.options.model=gemma3:4b
spring.ai.ollama.chat.options.keep_alive=20m
spring.ai.ollama.chat.options.temperature=0.2

spring.cassandra.local-datacenter=datacenter1
spring.cassandra.contact-points=127.0.0.1:9042
Then, we’ll configure our ollamaChatClient bean configuration to use CassandraChatMemoryRepository.
final CassandraChatMemoryRepository chatMemoryRepository;

public ChatClientConfig(CassandraChatMemoryRepository chatMemoryRepository) {
    this.chatMemoryRepository = chatMemoryRepository;
}

@Bean
public ChatClient ollamaChatClient(OllamaChatModel chatModel) {
    ChatMemory chatMemory = MessageWindowChatMemory
            .builder()
            .chatMemoryRepository(chatMemoryRepository)
            .maxMessages(15)
            .build();

    return ChatClient
            .builder(chatModel)
            .defaultAdvisors(
                    MessageChatMemoryAdvisor.builder(chatMemory).build()
            ).build();
}
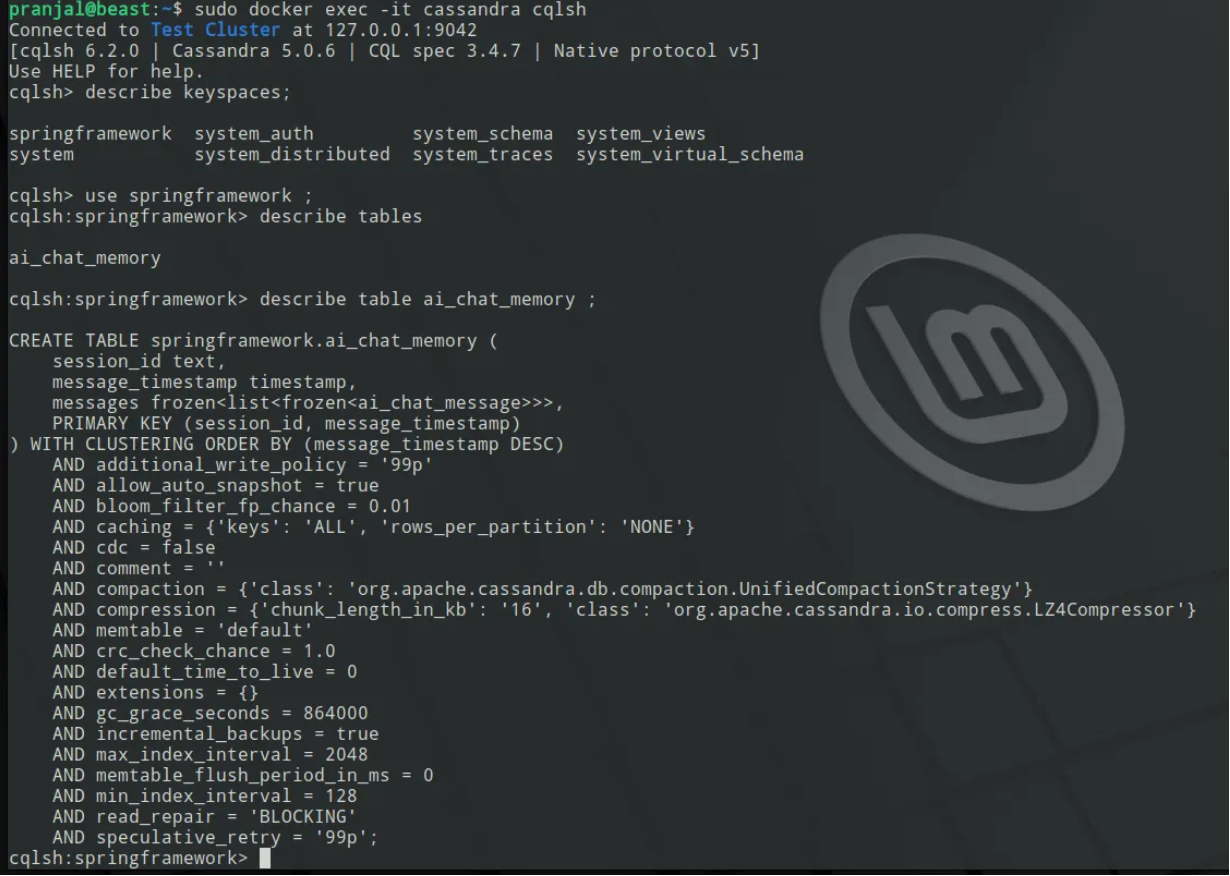
Now, even if you restart you application, the chat client will still recognize you!
In the meantime, you can see what’s going on on the DB side through cqlsh, and you can remove history if you want.
Retrieval Augmented Generation (RAG) with Vector Store
Now in my opinion, the most fun part!
I will create a local data store from which our LLM will learn some info about us. We will create a vector store out of this data, so that our LLM can always access it before answering our questions.
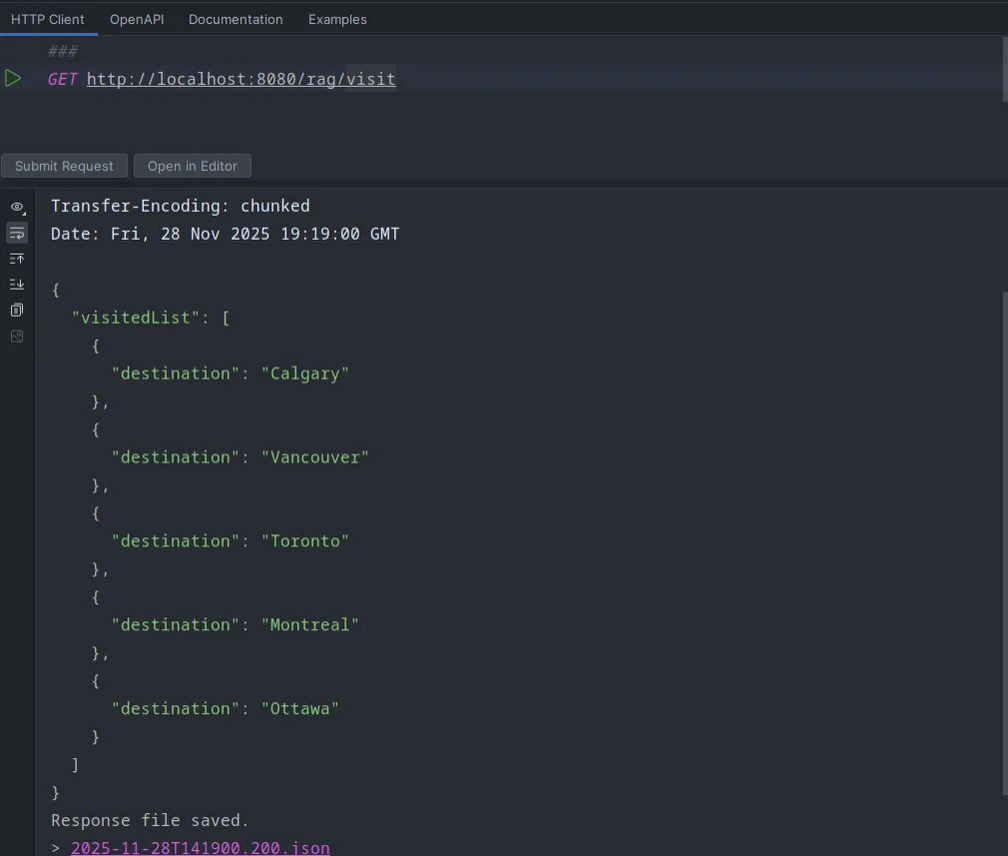
First, I’ll create a visited.json file in the resources, where I’ll mention the places that I’ve already visited in Canada.
[
  {
    "destination": "Calgary"
  },
  {
    "destination": "Vancouver"
  },
  {
    "destination": "Toronto"
  },
  {
    "destination": "Montreal"
  },
  {
    "destination": "Ottawa"
  }
]
This is our data store that we will vectorize using an embedding model. This one is different from our LLMs. Embedding models basically turn the textual data into numbers in the vector space. The default embedding model that Spring AI chooses for Ollama client is mxbai-embed-large. You can just load that model in Ollama. You can change the default embedding model using spring.ai.ollama.embedding in the properties file.
docker exec -it ollama ollama run mxbai-embed-large
And, we’ll add another advisor QuestionAnswerAdvisor to our bean definition for Ollama client to support the vector store that we are going to create next.
@Bean
public ChatClient ollamaChatClient(OllamaChatModel chatModel, VectorStore vectorStore) {
    ChatMemory chatMemory = MessageWindowChatMemory
            .builder()
            .chatMemoryRepository(chatMemoryRepository)
            .maxMessages(15)
            .build();

    return ChatClient
            .builder(chatModel)
            .defaultAdvisors(
                    MessageChatMemoryAdvisor.builder(chatMemory).build(),
                    QuestionAnswerAdvisor.builder(vectorStore).build()
            ).build();
}
Now, we’ll create another bean definition for the vector store creation. It’ll create one if it doesn’t find an existing one. Otherwise it’ll reuse the existing vector store.
private static final String VECTOR_STORE_NAME = "/vectorStore.json";
private static final String METADATA_FILE_NAME = "visited.json";

@Value("classpath:/data/visited.json")
Resource visitedPlacesJson;

@Bean
public SimpleVectorStore simpleVectorStore(EmbeddingModel embeddingModel) {
    SimpleVectorStore simpleVectorStore = SimpleVectorStore.builder(embeddingModel).build();
    File vectorStoreFile = getVectorStoreFile();

    if (vectorStoreFile.exists()) {
        simpleVectorStore.load(vectorStoreFile);

    } else {
        TextReader reader = new TextReader(visitedPlacesJson);
        reader.getCustomMetadata().put("filename", METADATA_FILE_NAME);

        List<Document> documentList = reader.get();
        simpleVectorStore.add(documentList);

        TokenTextSplitter tokenTextSplitter = new TokenTextSplitter();
        List<Document> splitDocuments = tokenTextSplitter.apply(documentList);
        simpleVectorStore.add(splitDocuments);

        simpleVectorStore.save(vectorStoreFile);
    }

    return simpleVectorStore;
}

private File getVectorStoreFile() {
    Path path = Paths.get("src", "main", "resources", "data");
    String absolutePath = path.toFile().getAbsolutePath() + VECTOR_STORE_NAME;
    return new File(absolutePath);
}
I have also created two simple records to get the data in structured format.
public record VisitedPlaces(List<Visited> visitedList) {
}

record Visited(String destination) {
}
And, finally the controller itself.
@GetMapping("/visit")
public VisitedPlaces models(
        @RequestParam(value = "message", defaultValue = "Give me all places I have visited.")
        String message) {

    return ollamaChatClient
            .prompt()
            .user(message)
            .call()
            .entity(VisitedPlaces.class);
}
That’s it! Now when I hit the API, it just knows where I have visited.
Or, if I ask where should I visit next, it gives me options without the places I’ve already visited.
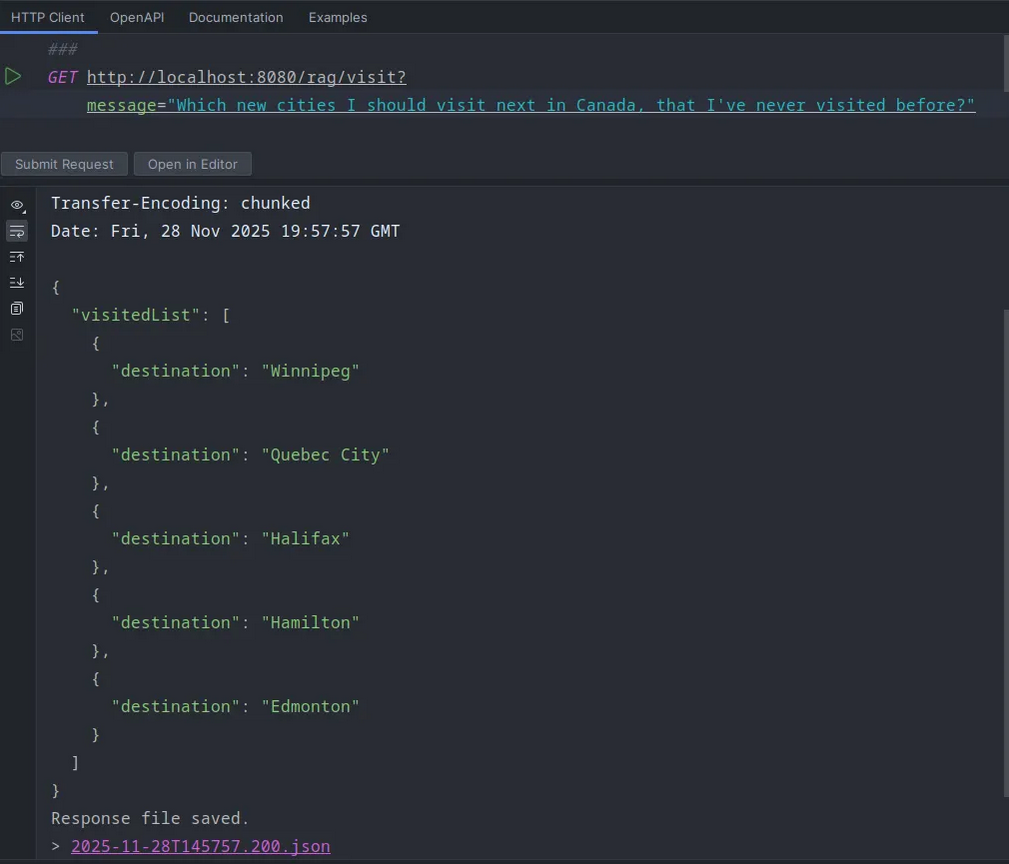
Hamilton? Seriously?
I thought I would cover PGVector here, but this one has already gone for too long. I’ll do it in the next one.