Spring AI Series: #3 RAG with PGVector
Check out the previous article in this series: Persistent Chat Memory, Vector Store and Retrieval Augmented Generation (RAG)
This will be a rather short one. We’ll be setting up a PostgreSQL instance as our vector database and integrate that with Spring AI.
PGVector Setup
Let’s first spin up a Postgres instance in Docker.
docker pull postgres
docker run -p 5432:5432 -e POSTGRES_USER=postgresu -e POSTGRES_PASSWORD=postgresp --rm --name postgres -d postgres
Now to setup pgvector, first, let’s check the postgres version of our docker instance and install the appropriate pgvector extension.
docker exec -it postgres psql -U postgresu
~ SELECT version();
My postgres container has version 18.1, so we’ll have to install postgresql-18-pgvector.
docker exec -it postgres sh
> apt update
> apt install postgresql-18-pgvector
And now, we’ll run some queries through psql to create a database for this project and enable three extensions to support vector data storage and indexing.
docker exec -it postgres psql -U postgresu
~ CREATE DATABASE vectordb;
~ \c vectordb;

~ CREATE EXTENSION IF NOT EXISTS vector;
~ CREATE EXTENSION IF NOT EXISTS hstore;
~ CREATE EXTENSION IF NOT EXISTS "uuid-ossp";
So, all our required extensions are enabled. Now, before creating the table, we’ll have to check the output dimension of our embedding model. If you remember our current set up, we’re using our local Ollama instance and the embedding model we’re using is mxbai-embed-large. It has an output dimension of 1024 (check here). Let’s create the table accordingly and index our vector data column.
CREATE TABLE IF NOT EXISTS vector_store (
 id uuid DEFAULT uuid_generate_v4() PRIMARY KEY,
 content text,
 metadata json,
 embedding vector(1024)
);

CREATE INDEX ON vector_store USING HNSW (embedding vector_cosine_ops);
That’s it! Our database is ready to go. Now, we’ll do the rest of the configuration on the application side.
Configuring PGvector Vector Store in Spring AI
We’ll add the dependency for PGvector vector store in our build script first.
dependencies {
    implementation 'org.springframework.boot:spring-boot-starter-web'
    implementation 'org.springframework.ai:spring-ai-starter-model-google-genai'
    implementation 'org.springframework.ai:spring-ai-starter-model-ollama'
    implementation 'org.springframework.ai:spring-ai-advisors-vector-store'
    implementation 'org.springframework.ai:spring-ai-starter-model-chat-memory-repository-cassandra'
    implementation 'org.springframework.ai:spring-ai-starter-vector-store-pgvector'
}
Then, we’ll add our db connection specific parameters in application properties.
spring.application.name=TestAgent

spring.ai.google.genai.chat.options.model=gemini-2.0-flash-lite
spring.ai.google.genai.api-key=${GEMINI_API_KEY}

spring.ai.ollama.base-url=http://localhost:11434
spring.ai.ollama.chat.options.model=gemma3:4b
spring.ai.ollama.chat.options.keep_alive=20m
spring.ai.ollama.chat.options.temperature=0.5

spring.cassandra.local-datacenter=datacenter1
spring.cassandra.contact-points=127.0.0.1:9042

spring.datasource.url=jdbc:postgresql://localhost:5432/vectordb
spring.datasource.username=postgresu
spring.datasource.password=postgresp
spring.ai.vectorstore.pgvector.dimensions=1024
spring.ai.vectorstore.pgvector.index-type=hnsw
spring.ai.vectorstore.pgvector.distance-type=cosine_distance
spring.ai.vectorstore.pgvector.max-document-batch-size=10000
Now, we’ll get rid of all our local simple vector store specific code and simplify the bean configuration for our Ollama chat client.
@Bean
public ChatClient ollamaChatClient(OllamaChatModel chatModel, VectorStore vectorStore) {
    ChatMemory chatMemory = MessageWindowChatMemory
            .builder()
            .chatMemoryRepository(chatMemoryRepository)
            .maxMessages(15)
            .build();

    return ChatClient
            .builder(chatModel)
            .defaultAdvisors(
                    MessageChatMemoryAdvisor.builder(chatMemory).build(),
                    QuestionAnswerAdvisor.builder(vectorStore).build()
            ).build();
}
We didn’t change much, in fact all we did was we got rid of the simpleVectorStore bean configuration. Now, Spring’s Autoconfiguration will configure PgVectorStore as the vector store instead.
Now, we got rid of the simpleVectorStore bean configuration, but we were loading our local document through that bean. What we’ll do now is we’ll autowire our VectorStore in our controller and create an endpoint to trigger the vectorization, and it will get stored into our PGvector database!
public final VectorStore vectorStore;

@Value("classpath:/data/visited.json")
Resource visitedPlacesJson;

@GetMapping("/pgload")
public ResponseEntity<?, ?> modelPGload() {
    TextReader reader = new TextReader(visitedPlacesJson);
    reader.getCustomMetadata().put("filename", "visited.json");

    List<Document> documentList = reader.get();
    vectorStore.add(documentList);

    return new ResponseEntity<>("Document loaded", HttpStatus.OK);
}
Now we can test how similarity searches work with vector databases-
@GetMapping("/pgload/read")
public List<Document> modelPGloadRead() {
    return vectorStore.similaritySearch(
            SearchRequest.builder()
                    .query("Ottawa")
                    .topK(5)
                    .build());
}
And, we can continue chatting with our chat client, but now our chat history are stored in a Cassandra database, and we have a working RAG implementation leveraging a vector database!
@GetMapping("/pgvector")
public VisitedPlaces modelsPG(
        @RequestParam(value = "message",
                defaultValue = "Give me all the places I have visited.")
        String message) {

    return ollamaChatClient
            .prompt()
            .advisors(advisorSpec ->
                    advisorSpec.param(
                            ChatMemory.CONVERSATION_ID,
                            ChatMemory.DEFAULT_CONVERSATION_ID))
            .user(message)
            .call()
            .entity(VisitedPlaces.class);
}
I’ve now dropped all chat history from our Cassandra instance. Now, before triggering the document loading endpoint-
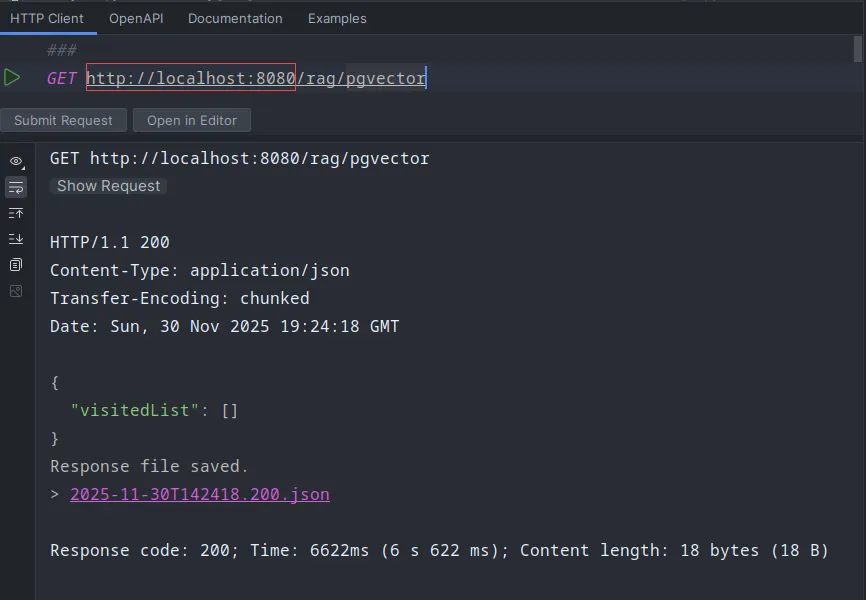
After triggering the document load-
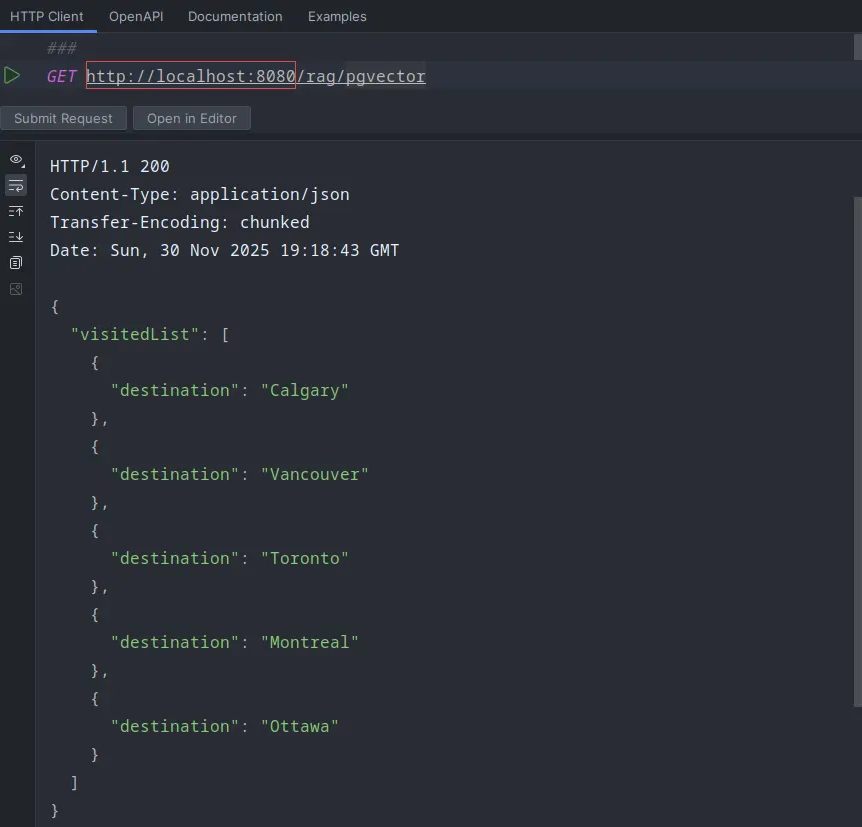
Isn’t this amazing!
We’ll explore tool calling and many other Agentic features in our coming segments. Stay tuned!