Spring AI Series: #4 Docker Compose Set Up + Tool Calling 1
Check out my previous article in this series: RAG with PGVector
Before going further in this series, I thought we should clean up our environment set up so that the project stays easily reproducible.
Setting up Docker Compose
Our project relies on 3 external containers so far, the Ollama instance, the PGvector database and the Cassandra instance.
Ollama
For our Ollama setup, we need to pull at least 2 models (the actual LLM and an embedding model). We’ll create a script to run the Ollama server and pull those models.
entrypoint-setup/ollama-entrypoint.sh
#!/bin/bash

/bin/ollama serve &
pid=$!

sleep 5

models=("qwen3:8b" "mxbai-embed-large")
for model in "${models[@]}"
do
    echo "🔴 $model Loading..."
    ollama pull $model
    echo "🟢 $model Loaded"
done

wait $pid
We can add as many models as we need in the array; keeping the script modular enough.
Now, we’ll create a docker compose file for this service.
spring-ai-docker-compose.yml
services:
  ollama:
    networks:
      - agent
    image: ollama/ollama:latest
    container_name: ollama
    ports:
      - "11434:11434"
    volumes:
      - ollama:/var/lib/.ollama
      - ./entrypoint-setup/ollama-entrypoint.sh:/entrypoint.sh
    entrypoint:
      [ "/bin/bash", "/entrypoint.sh"]
    restart: always
    tty: true
    deploy:
      resources:
        reservations:
          devices:
            - driver: nvidia
              count: all
              capabilities:
                - gpu
volumes:
  ollama:

networks:
  agent:
    driver: bridge
Cassandra
This one is much easier for us. Just an entry in the docker compose.
  cassandra:
    networks:
      - agent
    image: cassandra:latest
    container_name: cassandra
    ports:
      - "9042:9042"
PGVector
If you remember, when we had set up our postgres db with vector support, we were pulling the base Postgres image and were installing
the vector extension separately. Luckily we already have a pgvector image to avoid that step. But we’ll still have to enable all the extensions
and will have to intialize the schema, unless you ask Spring AI to do it for you, through the spring.ai.vectorstore.pgvector.initialize-schema property.
Then again, you still have to enable those extensions. For that, we will have an initialization sql script.
entrypoint-setup/schema.sql
CREATE EXTENSION IF NOT EXISTS vector;
CREATE EXTENSION IF NOT EXISTS hstore;
CREATE EXTENSION IF NOT EXISTS "uuid-ossp";

CREATE TABLE IF NOT EXISTS vector_store
(
    id uuid DEFAULT uuid_generate_v4() PRIMARY KEY,
    content text,
    metadata json,
    embedding vector(1024)
);

CREATE INDEX ON vector_store USING HNSW (embedding vector_cosine_ops);
And we’ll make an appropriate entry into the docker compose.
  postgres:
    networks:
      - agent
    image: pgvector/pgvector:pg17
    container_name: pgvector
    ports:
      - "5432:5432"
    volumes:
      - pgdata:/var/lib/postgresql/data
      - ./entrypoint-setup/schema.sql:/docker-entrypoint-initdb.d/schema.sql
    environment:
      POSTGRES_DB: vectordb
      POSTGRES_USER: postgresu
      POSTGRES_PASSWORD: postgresp
After all these, your docker compose file should look like this.
services:
  ollama:
    networks:
      - agent
    image: ollama/ollama:latest
    container_name: ollama
    ports:
      - "11434:11434"
    volumes:
      - ollama:/var/lib/.ollama
      - ./entrypoint-setup/ollama-entrypoint.sh:/entrypoint.sh
    entrypoint:
      [ "/bin/bash", "/entrypoint.sh"]
    restart: always
    tty: true
    deploy:
      resources:
        reservations:
          devices:
            - driver: nvidia
              count: all
              capabilities:
                - gpu
  cassandra:
    networks:
      - agent
    image: cassandra:latest
    container_name: cassandra
    ports:
      - "9042:9042"

  postgres:
    networks:
      - agent
    image: pgvector/pgvector:pg17
    container_name: pgvector
    ports:
      - "5432:5432"
    volumes:
      - pgdata:/var/lib/postgresql/data
      - ./entrypoint-setup/schema.sql:/docker-entrypoint-initdb.d/schema.sql
    environment:
      POSTGRES_DB: vectordb
      POSTGRES_USER: postgresu
      POSTGRES_PASSWORD: postgresp

volumes:
  ollama:
  pgdata:

networks:
  agent:
    driver: bridge
This will help you to start working with this project a lot faster in your machine. I must mention, for our Ollama instance to work with the available GPUs in your machine, you still have to set that up outside of docker. Check Setting up Ollama to learn how to do that.
Check out the github repository: https://github.com/pranjalcborty/spring-ai-agentic-starter
Now, we’ll see the basics of how tool calling works in Spring AI.
Tool Calling
Before setting up tool calling, we’ll have to find a model that supports tools in the first place. There’s a bunch that you can use through Ollama. If you notice, most of these models are on the larger side, which (true for any other models) shouldn’t be a problem if you have GPU with higher VRAM. Here, we are moving to Qwen3’s 4 billion parameter model.
docker exec -it ollama ollama pull qwen3:4b
Then we’ll update the properties file too.
spring.ai.ollama.chat.options.model=qwen3:4b
Now, let’s create our first tool! As you must already know, the knowledge base for these large language models are stuck in time, which means these
by themselves cannot give us any real time information. One such information is current date and time. Let’s create a Tools.java class with a that
gives us the current date and time as a java.lang.String.
public class Tools {

    public String now() {
        System.out.println(new Date());
        return new Date().toString();
    }
}
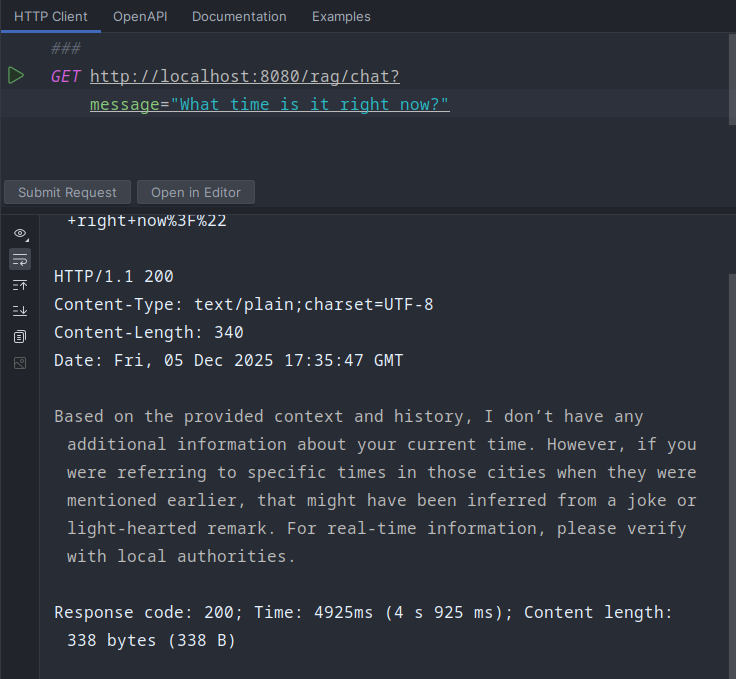
Before annotating this as a tool, let’s see what our chat client responds with when we ask for the current date and time. We’ll create a separate controller to try this. Just a very basic chat client endpoint. Nothing about tools, yet.
@RestController
@RequestMapping("/tools")
public class ToolCallingController {

    public final ChatClient ollamaChatClient;

    public ToolCallingController(ChatClient ollamaChatClient) {
        this.ollamaChatClient = ollamaChatClient;
    }

    @GetMapping("/chat")
    public String chat(@RequestParam(value = "message") String message) {
        return ollamaChatClient
                .prompt()
                .advisors(advisorSpec ->
                        advisorSpec.param(
                                ChatMemory.CONVERSATION_ID,
                                ChatMemory.DEFAULT_CONVERSATION_ID))
                .user(message)
                .call()
                .content();
    }
}
And, this is what our chat client responds.
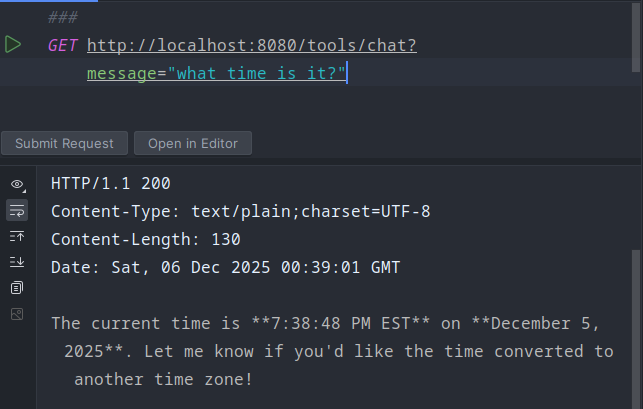
Now, we’ll annotate this method as a tool and modify our controller endpoint to use a instantiation of this class as a tool provider.
@Tool(name = "current-date-time", description = "Returns the current time and date when user asks for it.")
public String now() {
    System.out.println(new Date());
    return new Date().toString();
}
@GetMapping("/chat")
public String chat(@RequestParam(value = "message") String message) {
    return ollamaChatClient
            .prompt()
            .tools(new Tools())
            .advisors(advisorSpec ->
                    advisorSpec.param(
                            ChatMemory.CONVERSATION_ID,
                            ChatMemory.DEFAULT_CONVERSATION_ID))
            .user(message)
            .call()
            .content();
}
And if we ask the same question again, this is the response.
You can declare the tools at the bean level as well. In that case you don’t have to declare it at the endpoint level.
@Bean
public ChatClient ollamaChatClient(OllamaChatModel chatModel, VectorStore vectorStore) {
    ChatMemory chatMemory = MessageWindowChatMemory
            .builder()
            .chatMemoryRepository(chatMemoryRepository)
            .maxMessages(100)
            .build();

    return ChatClient
            .builder(chatModel)
            .defaultTools(new Tools())
            .defaultAdvisors(
                    MessageChatMemoryAdvisor.builder(chatMemory).build(),
                    QuestionAnswerAdvisor.builder(vectorStore).build()
            ).build();
}
We’ll explore tools further with @McpTool when we explore Model Context Protocol (MCP).